Thursday, December 17, 2020

Switching Java versions by command in Ubuntu

At first install multiple versions of Java. 

$ sudo apt update
$ sudo apt install openjdk-8-jdk
$ sudo apt install openjdk-11-jdk

Then you can switch java versions as follows:

$ update-java-alternatives --list
java-1.11.0-openjdk-amd64      1111       /usr/lib/jvm/java-1.11.0-openjdk-amd64
java-1.8.0-openjdk-amd64       1081       /usr/lib/jvm/java-1.8.0-openjdk-amd64
$ sudo update-java-alternatives --set /usr/lib/jvm/java-1.11.0-openjdk-amd64
$ javac -version
javac 11.0.9.1
$ java -version
openjdk version "11.0.9.1" 2020-11-04

If you set JAVA_HOME, maybe you have to change this too.

Wednesday, December 9, 2020

Springboot + MPA + webpack


MPA

Webpack is usually used for Single page application recently. You can find many articles on how to set up webpack for SPA. But, in my case, I had to use webpack for Multi Page Application (MPA).

It was a bit difficult to use Webpack for MPA Spring boot, so I want to share how I did it.

How I used webpack for spring boot MPA

You can see how I used webpack for spring boot MPA from here: https://github.com/lechatthecat/vanilla-javascript-boilerplate-spring-boot


Saturday, March 14, 2020

Use Kubernetes locally and make Nginx & MariaDB Pods

Prerequisite

  • OS: ubuntu 18.04.2 LTS

What is Kubernetes?

Kubernetes is a container orchestration tool developed by Google. Kubernetes is a platform tool to manage containerized workloads and services.
Kubernetes is a portable, extensible, open-source platform for managing containerized workloads and services, that facilitates both declarative configuration and automation. It has a large, rapidly growing ecosystem. Kubernetes services, support, and tools are widely available.
-- Kubernetes https://kubernetes.io/docs/concepts/overview/what-is-kubernetes/

Official Interactive tutorial

If you don't want to install minikube locally, you can also try the official kubernetes interactive tutorial.

Minikube

But we don't use the tutorial. We will use Minikube to run Kubernetes locally. But what is minikube? The website of Kubernetes explains what it is.
Minikube is a tool that makes it easy to run Kubernetes locally. Minikube runs a single-node Kubernetes cluster inside a Virtual Machine (VM) on your laptop for users looking to try out Kubernetes or develop with it day-to-day.
-- Kubernetes https://kubernetes.io/docs/setup/learning-environment/minikube/

Kubernetes vs Docker-compose vs Docker Swarm

Kubernetes is for running and connecting containers on multiple hosts (= cluster). Each node is a VM or a physical computer that serves as a worker machine in a Kubernetes cluster according to their explanation.

Use minikube

Install minikube

See this page of Kubernetes. This tutorial is well written.

Use minikube and kubectl

Simply run this command to start minikube.
$ minikube start
Then you will see these messages:
Now we are ready to use "kubectl" locally. Kubectl is a command line tool for controlling Kubernetes clusters.

Create nginx service

With kubectl, we will use a container image nginx:1.7.9 to deploy nginx in our kubernetes cluster.
At first, make sure the maser node is working:
$ kubectl get all 
NAME                 TYPE        CLUSTER-IP   EXTERNAL-IP   PORT(S)   AGE
service/kubernetes   ClusterIP   10.96.0.1    <none>        443/TCP   3d7h
Then create yaml files somewhere as follows:
nginx_deploy.yml
apiVersion: apps/v1
kind: Deployment
metadata:
  name: nginx-deployment
  labels:
    name: nginx
spec:
  selector:
    matchLabels:
      name: nginx
  replicas: 1 # tells deployment to run 1 pod matching the template
  template:
    metadata:
      labels:
        name: nginx
    spec:
      containers:
      - name: nginx
        image: nginx:1.23.1
        ports:
        - containerPort: 80
        resources:
          limits:
            memory: 512Mi
            cpu: "1"
          requests:
            memory: 256Mi
            cpu: "0.2"
nginx_service.yml
apiVersion: v1
kind: Service
metadata:
  name: nginx
  labels:
    name: nginx
spec:
  type: NodePort
  ports:
    - port: 80
      nodePort: 30080
      name: http
  selector:
    name: nginx
  externalIPs:
   - 192.168.49.2
Save the files and run this command:
$ cd (the directory where you saved the two yaml files)
$ kubectl apply -f ./nginx_deploy.yml  -f ./nginx_service.yml

Check the nginx from browser

Check your minikube IP:
$ minikube ip
192.168.99.100
Check port number:
$ kubectl describe service/nginx
Name:                     nginx
Namespace:                default
Labels:                   name=nginx
Annotations:              kubectl.kubernetes.io/last-applied-configuration:
                            {"apiVersion":"v1","kind":"Service","metadata":{"annotations":{},"labels":{"name":"nginx"},"name":"nginx","namespace":"default"},"spec":{"...
Selector:                 name=nginx
Type:                     NodePort
IP:                       10.111.250.254
Port:                     http  80/TCP
TargetPort:               80/TCP
NodePort:                 http  30080/TCP ####Port number is here!!!!!!!####
Endpoints:                172.17.0.4:80,172.17.0.5:80
Session Affinity:         None
External Traffic Policy:  Cluster
Events:                   <none>
Or simply use this command: 
$ minikube service nginx --url
http://192.168.99.100:30080
Check from the browser with the IP and port. Confirm nginx is working in the cluster.
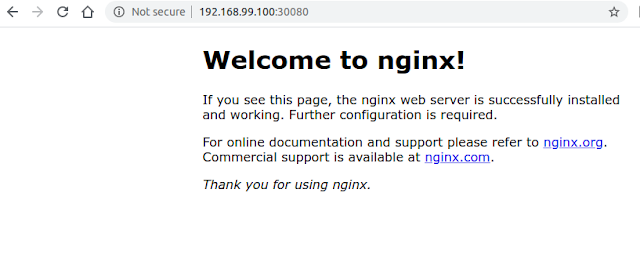
We can expose this nginx as loadbalancer:
$ kubectl expose deployment nginx-deployment --type=LoadBalancer --name=lb-nginx
$ minikube service nginx --url
http://192.168.49.2:30920
Then you can use this URL to access your service.

The difference between NodePort and LoadBalancer is:
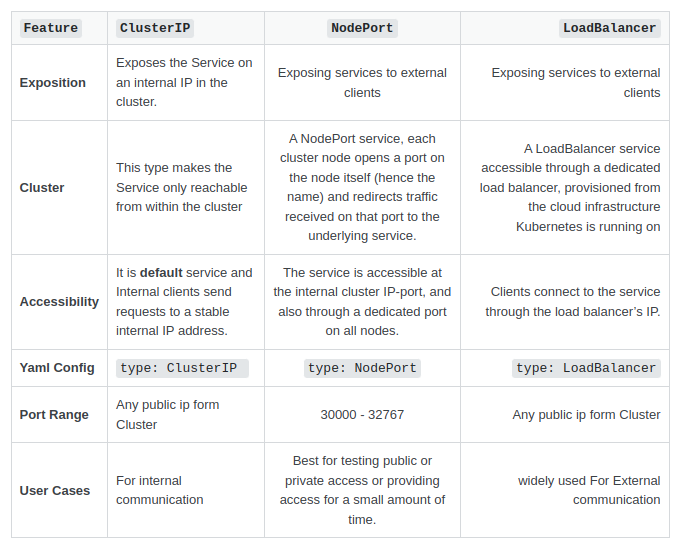
Create MariaDB service

Now we will create MariaDB service. At first, we will create the volume (space to save mariadb's data). Create the following files:
persistent_valume_claim.yaml:
apiVersion: v1
kind: PersistentVolumeClaim
metadata:
  labels:
    app: mariadb
  name: mariadb-pv-claim
spec:
  storageClassName: manual
  accessModes:
  - ReadWriteOnce
  resources:
    requests:
      storage: 1000M
persistent_volume.yaml:
kind: PersistentVolume
apiVersion: v1
metadata:
  name: mariadb-pv
  labels:
    type: local
spec:
  storageClassName: manual
  capacity:
    storage: 1000M
  accessModes:
    - ReadWriteOnce
  hostPath:
    path: "/mnt/data"
Now apply the files:
$ cd (the directory where you saved the two yaml files)
$ kubectl apply -f ./persistent_volume.yaml
$ kubectl apply -f ./persistent_valume_claim.yaml  
The we will create deployment for mariadb. Create the following files:
mariadb_deploy.yml
apiVersion: apps/v1
kind: Deployment 
metadata:
  name: mariadb-deployment
spec:
  replicas: 1 # how many replicas of pods you want to create
  selector:
    matchLabels:
      app: mariadb
  template: # details for pods
    metadata:
      labels:
        app: mariadb # service will look for this label
    spec: # specification for Pods
      containers:
      - name: mariadb
        image: mariadb
        ports:
        - containerPort: 3306 
        env:
        - name: MARIADB_ROOT_PASSWORD
          value: secret
        resources:
          limits:
            memory: 512Mi
            cpu: "1"
          requests:
            memory: 256Mi
            cpu: "0.2"
and mariadb_service.yml:
apiVersion: v1
kind: Service
metadata:
  name: mariadb
  labels:
    name: mariadb
spec:
  selector:
    app: mariadb
  ports:
    - protocol: TCP
      port: 3306
      targetPort: 3306
Save the files and run this command:
$ cd (the directory where you saved the two yaml files)
$ kubectl apply -f ./mariadb_deploy.yml  -f ./mariadb_service.yml
Now you will have mariadb service:
$ kubectl get all 
NAME         TYPE           CLUSTER-IP      EXTERNAL-IP    PORT(S)        AGE
kubernetes   ClusterIP      10.96.0.1       <none>         443/TCP        80m
lb-nginx     LoadBalancer   10.103.22.52    <pending>      80:30150/TCP   27s
mariadb      ClusterIP      10.103.28.199   <none>         3306/TCP       21m
nginx        NodePort       10.109.85.209   192.168.49.2   80:30080/TCP   6s

Now we will create configmap for mariadb service as "mariadb_configmap.yml":
apiVersion: v1
kind: ConfigMap
metadata:
  name: mariadb-configmap
data:
  database_url: mariadb
Then apply this file:
$ kubectl apply -f ./mariadb_configmap.yml
Now we can use the mariadb:
$ kubectl exec mariadb-deployment-644cf75948-9prh6 mariadb -- mariadb -uroot -proot -e "select version()"
version()
10.9.3-MariaDB-1:10.9.3+maria~ubu2204

To access from outside of Pods, we need to expose the mariadb:
$ kubectl expose deploy/mariadb-deployment --port 3306 --target-port 3306 --type LoadBalancer --name=mariadb-exposed

Now we can get the URL of the exposed mariadb:
$ minikube service mariadb-exposed --url
http://192.168.49.2:31955

We can use this information to connect to the DB.

Cleaning up

To delete the service and deployment after confirming from the browser:
$ kubectl delete service/nginx service/mariadb deployment.apps/nginx-deployment deployment.apps/mariadb-deployment
$ kubectl delete pvc mariadb-pv-claim
$ kubectl delete pv mariadb-pv
$ kubectl get all 


Saturday, February 8, 2020

Blackboxing javascript files. Ignore unnecessary js files during debugging.

Say, we have this html:
<head>
    <script src="https://ajax.googleapis.com/ajax/libs/jquery/3.4.1/jquery.min.js"></script>
</head>
<div>
  <button id="btn">click me</button>
</div>
<div>
  <span class="applicant_name">John</span>
  <span class="applicant_name">Jason</span>
  <span class="applicant_name">Eric</span>
  <span class="applicant_name">Steven</span>
  <span class="applicant_name">Albert</span>
  <span class="applicant_name">Elin</span>
</div>
And this javascript code for the html:
$(function() {
    $('#btn').on('click', () => {
        $('.applicant_name').each((index, element) => {
            console.log($(element).text());
        });
    });
});
JS fiddle: https://jsfiddle.net/shuNaka/bcma3q2j/

We want to debug it, so we press F8 after opening the developer tool on Chrome, but it always stops in a library or jQuery, not in my code. 
I want to debug my code, not these libraries. What can I do?

Blackboxing

We can ignore these libraries by blackboxing those on Chrome.
Open the developer tool by pressing F12 and open "Setting". 
Then click on the "Blackboxing". You can add patterns of javascript file names to ignore during debugging. 

Or you can simply right-click on the source panel. Then you can blackbox the selected javascript file. 

Blackboxed files are ignored even if you hit F8 so that we can debug only the files we want. So I can debug only my code like this: 


You can pause at the code like the image above on the jsfiddle by hitting F8 and clicking on the "click me" button at the same time many times.

This stackoverflow might be interesting too.


You must blackbox unnecessary js files before clicking on the button.

You can use the blackboxing for the "debugger" command, too.

Monday, January 13, 2020

Calculate expected time of work by PERT

PERT(Program Evaluation and Review Technique) has the following kinds of time:
  • optimistic time
    • the minimum possible time required to accomplish an activity (o) or a path (O), assuming everything proceeds better than is normally expected.
  • most likely time
    • the best estimate of the time required to accomplish an activity (m) or a path (M), assuming everything proceeds as normal.
  • pessimistic time
    • the maximum possible time required to accomplish an activity (p) or a path (P), assuming everything goes wrong (but excluding major catastrophes).
Expected time is calculated as follows:
ExpectedTime = (OptimisticTime + 4MostLikelyTime + PessimisticTime) ÷ 6
I've made a javascript code to automatically calculate the above:

Optimistic timeday(s)
Most likely timeday(s)
Pessimistic timeday(s)
Expected timeEnter every input field.


Saturday, January 11, 2020

Docker and Docker-compose

What is Docker

What is Docker?
Docker is a set of platform as a service (PaaS) products that use OS-level virtualization to deliver software in packages called containers.
-"Docker (software)" of Wikipedia
If we use "Docker", we can deploy an web application with its virtual environment. Each container is different virtual environment suited for the application inside, so we don't need to worry about the difference between the devlopment and the production. Just use Docker in both environments, then the application works as expected in both environments. It makes deployments/maintenance easier, so docker is loved by developers.

Install Docker

If you don't use Ubuntu/Linux
At first, you need to install Docker as follows:
If you use Ubuntu 18
If you don't use ubuntu18, you don't need to do this section. You must do this section to install Docker only if you are using Ubuntu.
At fist, maybe we will delete old dockers (if necessary).
$ sudo apt-get remove docker docker-engine docker.io
And install Docker from the offcial repository:
$ sudo apt-get update
# To enable https connection.
$ sudo apt-get install apt-transport-https ca-certificates curl software-properties-common
# To download GPG key.
$ curl -fsSL https://download.docker.com/linux/ubuntu/gpg | sudo apt-key add -
# Install the docker repository.
$ sudo add-apt-repository "deb [arch=amd64] https://download.docker.com/linux/ubuntu  $(lsb_release -cs)  stable" 
$ sudo apt-get update
# Install Docker.
$ sudo apt-get install docker-ce
Verify if Docker was successfully installed
Verify if Docker was successfully installed on your terminal (terminal: cmd aka command prompt, powershell, bash etc).
docker --version
#Docker version 19.03.5, build 633a0ea838
If the version is displayed, the installation is success.

Docker-compose

Docker-compose is installed along with the installation of Docker. Verify if Docker-compose is installed correctly.
docker-compose -v
#docker-compose version 1.24.1, build 4667896b
If the version is displayed, the installation is success.

Use Docker and Docker-compose

We will use Docker and Docker-compose to create Laravel environment. Do the following commands:
$ git clone https://github.com/lechatthecat/laravel-nginx-mysql-example-en.git
$ cd laravel-nginx-mysql-example
$ docker-compose up -d --build
$ docker-compose exec laravel ash
# In the laravel container:
$ sh -x ../laravel_build.sh
And voilĂ ! We can see the laravel's top page: http://localhost:10080/ 
It is a lot easier than Vagrant et Virtual Box.


You can see how it is created in the repository: https://github.com/lechatthecat/laravel-nginx-mysql-example-en/blob/master/docker-compose.yml
It is like this:
version: '3'
services:
    # mysql 8.0
    mydb:
        # image name
        image: mysql:8.0
        # Password and user name of mysql
        environment:
            MYSQL_ROOT_PASSWORD: 'root'
            MYSQL_USER: 'root'
            MYSQL_PASS: 'root'
        # Which port should be exposed
        ports:
            - 13306:3306
        container_name: mydb
        volumes:
            # Save the data in named "Volumes" of Docker
            - db-store:/var/lib/mysql
            # Or use the local file
            # - ./docker_db_data/mysql:/var/lib/mysql
            # Where to save the mysql's log
            - ./logs:/var/log/mysql:z
            # Where to load the my.cnf
            - ./docker/mysql/my.cnf:/etc/mysql/conf.d/my.cnf:z
        # Which network this container belongs to.
        networks:
            - app_net
    # The container of Laravel
    laravel:
        build:
            # Wnere to find the "Dockerfile".
            context: .
            dockerfile: docker/laravel/Dockerfile
        working_dir: /laravel
        volumes:
            # Where the source code should be saved.
            - ./laravel:/laravel
            # Where the bash file is (which is executed for the build)
            - ./docker/laravel/laravel_build.sh:/laravel_build.sh:z
            # Where to save laravel's log files
            - ./logs:/var/log/php
            # Where to load php.ini.
            - ./docker/laravel/php.ini:/usr/local/etc/php/php.ini
        # Wait until mydb container is ready.
        depends_on:
            - mydb
        container_name: laravel
        # Which network this container belongs to.
        networks:
            - app_net
    # nginx 1.17
    nginx:
        # image name
        image: nginx:1.17-alpine
        # Wait until "laravel" container is ready
        depends_on:
        - laravel
        # Which port should be exposed
        ports:
        - 10080:80
        volumes:
        # Where to find the files to serve
        - ./laravel:/laravel
        # Where to save nginx logs.
        - ./logs:/var/log/nginx
        # Where to load default.conf.
        - ./docker/nginx/default.conf:/etc/nginx/conf.d/default.conf
        container_name: nginx
        # Which network this container belongs to.
        networks:
            - app_net
networks:
    # Containers in same network can access each other by using its container name as host name
    app_net:
        driver: "bridge"
volumes:
    db-store: