This post is one of a series
Create an environment for Web development
- Vagrant/Virtualbox
- Install Apache or Nginx for PHP or Nginx for Python
- Install MySQL / Install MariaDB
- Install PHP / Install Python - You are here
Install Python3.6
We will install Python 3.6. At first, we will check what is installed and what is not:
$ yum list python*
Seems like Python 2.7 is installed in Cent OS 7 by default. But there is not Python 3.6 in this list. Seems like Python 3.5 is not installed in this OS by default. Do the following command to make a repository available to install Python 3.6:
$ sudo yum install -y https://centos7.iuscommunity.org/ius-release.rpm
This enables the repository of IUS Community Project. To install Python 3.6 from this repository, do this command:
$ sudo yum install -y python36u python36u-libs python36u-devel python36u-pip python-pip
To check if Python 3.6 is successfully installed, do the following command:
$ sudo python3.6 -V
$ sudo which python3.6
If the version is displayed, it is success.
Re-start your Apache (httpd) after the installation.
$ sudo systemctl restart httpd
FYI commands for CentOS6
$ sudo yum install -y https://centos6.iuscommunity.org/ius-release.rpm
$ sudo yum install -y python36u python36u-libs python36u-devel python36u-pip python-pip
$ sudo locate python3.6
$ sudo service httpd restart
Versions of Python
But even if you install python 3.x, the python called by "python" command on the console is usually python2.7. You can check it by running this command:
$ python -V
This is because python2.7 is sometimes used by system. Don't change the "python" symlink.
To use python3.6, run commands like this:
$ python3.6 -V
pip for Python2.7:
$ pip
pip for python3.6:
$ pip3.6
Hello World with Python
We will create a "index.py" file to display "<H1>This is my first CGI script</H1> Hello, world!" in a browser. Create a file named as "index.py" at C:\MyVM\MyCentOs. (I mean, inside the share folder of Vagrant). Inside index.py, write as follows:
#!/usr/bin/env python
# -- coding: UTF-8 --

print("Content-Type: text/html\n\r")
print ("""
    <TITLE>CGI script ! Python</TITLE>
    <H1>This is my first CGI script</H1>
    Hello, world!
""")
Please note that the line break type must be LF, not CR/RF. Python doesn't work without linebreaks because of its syntax. Use Visual studio code to see what linebreaks are used in the file.
Now do the following command to change the apache's config file:
$ sudo vi /etc/httpd/conf/httpd.conf
To change the text, hit "a" on your keyboard then insert mode will start.
Press a on your keyboard to be insert mode and you can edit the file. Press escape key to stop the insert mode. After stopping the insert mode, press Shift + g to go to the lowest row. :wq or Shift + zz to save and close the file. You can go to command mode by pressing : on your keyboard. To exit the file without saving the file, inout :q! and enter. To search a word, press ? then write a word what you want to search. For example, if you write ?aaa and press enter, "aaa" is searched and highlighted in the file. Press n to jump to next match.)
Add "ExecCGI" in the lines of "/var/www/html" as follows:
<Directory "/var/www/html">
Options Indexes FollowSymlinks ExecCGI
AllowOverride None
Require all granted
</Directory>
And add .py to Add handler:
AddHandler cgi-script .cgi .py
Directory
Add handler
Add handler is a comment at first:
Un-comment the AddHandler line and add .py:
Save and close it by ":wq".
Re-start Apache (httpd):
$ sudo systemctl restart httpd
If SELinux is enabled, we need to change the context too. Change it as follows:
$ sudo chcon -R -t httpd_sys_script_exec_t /var/www/html/index.py
Then, access to your index.py from your browser as follows:
http://192.168.33.10/index.py
Hello World!!
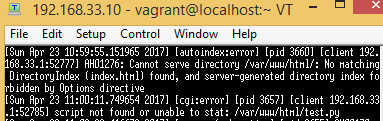
If it doesn't work and it shows 500 or 404 errors, do the following command to check the errors:
$ sudo less /var/log/httpd/error_log
You can see errors. Google the errors to deal with them.
What's next
Maybe you can try
Django, the Python web framework.