Sunday, January 27, 2019

Functional programming memo (with Java)

What the functional programming is

Object oriented programming has been often used to create programs so far. But recently, Functional programming is also considered to be as useful as object oriented programming, or even better than it in some respects.
The functional programming is:
In computer science, functional programming is a programming paradigm—a style of building the structure and elements of computer programs—that treats computation as the evaluation of mathematical functions and avoids changing-state and mutable data.
It is a declarative programming paradigm, which means programming is done with expressions or declarations instead of statements. In functional code, the output value of a function depends only on the arguments that are passed to the function, so calling a function f twice with the same value for an argument x produces the same result f(x) each time; this is in contrast to procedures depending on a local or global state, which may produce different results at different times when called with the same arguments but a different program state.
Eliminating side effects, i.e., changes in state that do not depend on the function inputs, can make it much easier to understand and predict the behavior of a program, which is one of the key motivations for the development of functional programming.
-- wikipedia Functional_programming
According to Tutorial point, functional programming offers the following advantages −
  • Bugs-Free Code − Functional programming does not support state, so there are no side-effect results and we can write error-free codes.
  • Efficient Parallel Programming − Functional programming languages have NO Mutable state, so there are no state-change issues. One can program "Functions" to work parallel as "instructions". Such codes support easy reusability and testability.
  • Efficiency − Functional programs consist of independent units that can run concurrently. As a result, such programs are more efficient.
  • Supports Nested Functions − Functional programming supports Nested Functions.
  • Lazy Evaluation − Functional programming supports Lazy Functional Constructs like Lazy Lists, Lazy Maps, etc.
But functional programming usually requires more memory. This Quora question compares Haskell (functional language) and C/C++.

Side effect

Side effects (in the context of computer science) are rarely used in functional programming.
In computer science, a function or expression is said to have a side effect if it modifies some state outside its local environment, that is to say has an observable interaction with the outside world besides returning a value. Example side effects of a particular function might consist in modifying a non-local variable, modifying a static local variable, modifying a mutable argument passed by reference, performing I/O or calling other side-effect functions.
-- wikipedia Side effect (computer science)

Referential transparency

Absence of side effects is a necessary, but not sufficient, condition for referential transparency. Referential transparency means that an expression (such as a function call) can be replaced with its value. This requires that the expression is pure, that is to say the expression must be deterministic (always give the same value for the same input) and side-effect free. A function without side effects can return different values according to its history or its environment, for example if its output depends on the value of a local static variable or a non-local variable respectively.
-- wikipedia Side effect (computer science)

Functional programming in practice

Use Haskel if you want to see what functional programming looks like. Or if you prefer JVM language, see Clojure.

Recursion


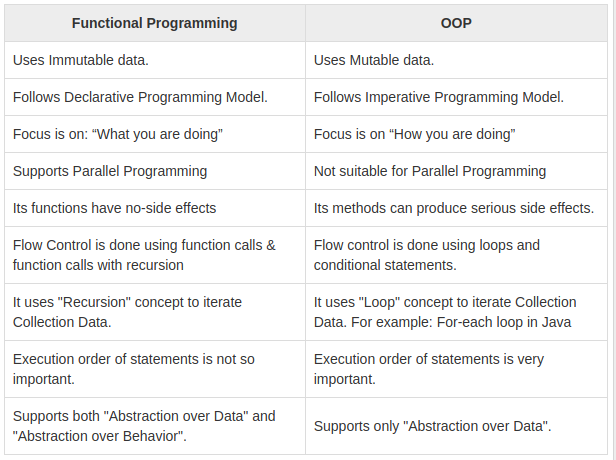
(This table is from tutorial point)

According to this table, functional programming uses recursive concept to iterate collection data. If you already know how to program in Java/Python, you can practice recursion in codingbat (recursive basic or recursive advanced).

Recursion in practice

For example, this is the recursive function (of Java code):
public int factorial(int n) {
  // Base case: if n is 1, we can return the answer directly
  if (n == 1) return 1;
  // All other cases except the base case above.
  return n * factorial(n-1);
}
This is the function that returns the factorial of n. For example, if the n is 3, it works like this:
  1. First iteration: n is 3, so this is not the base case, so the function returns
    3 * factorial(3-1);
  2. Second iteration: n is 3-1=2, so this is not the base case, so the function returns
    2 * factorial(2-1);
  3. Third iteration: n is 2-1=1, so this is the base case, so the function returns
    1;
So, overall, factorial(3) returns "3 * 2 * 1". So we could calculate "3!" without using for-loop or while-loop. This is the recursion.
By the way, if you forget to write the base case:
public int factorial(int n) {
  // All other cases except the base case above.
  return n * factorial(n-1);
}
The recursion doesn't stop at 1 and the function will be continued after 1 like "1 * factorial(1-1)" and then "0 * factorial(0-1)"... for infinite times. So this will cause a stack overflow.

String in a recursive function

We will see how to treat string data in a recursive function. This is an example of recursive function that changes all "pi" of a string to "3.14".
public String changePi(String str) {
  if(str.length() <= 1) return str;
  if(str.substring(0, 2).equals("pi")) return "3.14"+changePi(str.substring(2));
  return str.substring(0, 1) + changePi(str.substring(1));
}
So "piABCpi" becomes "3.14ABC3.14". This is one of the codingbat problems.
The following is the explanation of what the function changePi() is doing.

First check - whether the function should stop or not (or whether the string is too short)

This function, at first, checks if the str is too short or not.
if(str.length() <= 1) return str;
If you the string data is shorter than or equal to 1 letter, we don't need to check the str anymore because A string that contains only 1 letter can not be "pi". If this validation returns true, that is the time the function finishes the execution.

Second check - whether the first 2 letters of the string are "pi" or not

Then this part checks if the first two letters are "pi".
if(str.substring(0, 2).equals("pi")) return "3.14"+changePi(str.substring(2));
If it's "pi", it will return "3.14" and hand over the "str.substring(2)" to the next iteration. "str.substring(2)" means the string except the first two letters, so it is replacing the first two letters with "3.14" and continuing the iteration.

Third - returns the checked letter and hand over the rest to the next iteration

The third line of the function is this:
return str.substring(0, 1) + changePi(str.substring(1));
It is returning the checked letter and hand over the rest of the string to the next iteration. As a result of the second check, this string str.substring(0, 1)  can not be "p" with "i" behind it, so this is executed only when the function doesn't find "pi" in the checked string. 

Overall

By bringing the above together, when input string is "piABCpi", the changePi()function returns as follows:
First iteration
returned value from changePi(): "3.14"
the value handed over to changePi(): "ABCpi"
Second iteration
returned value from changePi(): "3.14A"
the value handed over to changePi(): "BCpi"
Second iteration
returned value from changePi(): "3.14AB"
the value handed over to changePi(): "Cpi"
And the third, fourth, fifth... it continues until the length of str variable handed over to the function becomes less than 1. Finally it returns "3.14ABC3.14" for the input "piABCpi".

IF

If/else can be repaced by these things. (Vavr’s Option)

A little more (with Javascript)

This video is nice. Though she is using Javascript, not Java.


Saturday, January 26, 2019

Create a dockerfile for a project (in Ubuntu18)


We learned how to use Docker and Docker-compose in these posts:
  1. How to install Docker
  2. How to make an image/a container
  3. Use Dockerfile and docker-compose
Now we will make a dockerfile and docker-compose file for this project JavaChatBoard.

Create Dockerfile

Make a folder named "java".
Copy and paste this to a txt file and name it as "Dockerfile" in the java folder.
# Most Dockerfiles start from a parent image.
# FROM *** indicates what base image you will use.
FROM centos:7

# Maintainer name
# MAINTAINER lechat thecat <frozenyogurt845@gmail.com>

# To use commands, use "RUN".
RUN yum -y update 
RUN yum install -y epel-release
RUN yum -y install https://centos7.iuscommunity.org/ius-release.rpm
RUN yum -y install git 
RUN yum -y install java-1.8.0-openjdk
RUN yum -y install maven
RUN yum -y install mariadb-server
RUN yum -y install vim

ENV MYSQL_ROOT_PASSWORD=root

# "EXPOSE" specifies which port you will open.
EXPOSE 8080

ENV PATH /opt/jdk/jdk-1.8.0/bin:$PATH

# CMD is used to start modules.
# For example: CMD ["command", "argument 1","argument 2"]
RUN cd /
RUN git clone https://github.com/lechatthecat/JavaChatBoard.git
# Caution! This downloads & installs all dependencies. It might take minutes.
RUN cd JavaChatBoard \
    && mvn clean package 
CMD exec java -jar /JavaChatBoard/target/chatboard-0.0.1-SNAPSHOT.jar --spring.config.location=file:/JavaChatBoard/src/main/resources/docker.application.properties

Create a docker-compose file

Copy and paste this to a txt file and save it as "docker-compose.yml". The path must be same with the java folder we created just now.
version: '3'
services:
    db:
        image: mariadb
        environment:
            MYSQL_ROOT_PASSWORD: 'root'
            MYSQL_USER: 'root'
            MYSQL_PASS: 'root'
        volumes:
        #This docker-entrypoint-initdb.d is used to make the initial data from .sql file.   
        - ../src/main/resources/sql:/docker-entrypoint-initdb.d
        - ./mariadb:/var/lib/mysql # Creating this folder for persisting data of the mariadb in your host
        ports:
        - "3306:3306"
        networks:
        - app_net
        container_name: mydb
    web-app:
        build: ./java
        ports:
        - "8080:8080"
        stdin_open: true
        tty: true
        depends_on:
        - db
        container_name: webapp
        networks:
        - app_net
networks:
    # Containers in same network can access each other by using its container name as host name
    app_net:
        driver: "bridge"

Start the project in docker by docker-compose

Go to the directory where we cloned the JavaChatBoard project and run these commands:
$ cd [PathToTheClonedJavaChatBoard]/JavaChatBoard/docker
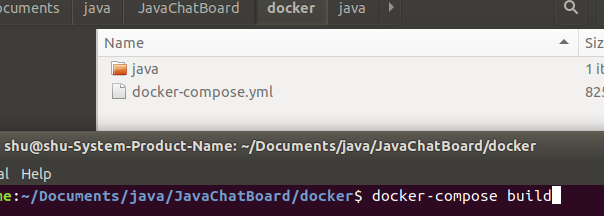
$ docker-compose build
$ docker-compose up -d
After the last command "docker-compose up -d", you can see the project is running on "http://localhost:8080". The project is running in a containner using MariaDB running in another container of Docker.
To stop the project:
$ sudo docker stop $(sudo docker ps -aq)
To delete docker objects:
$ docker system prune --volumes -f
See here for the pruning.

Useful commands

To build the containers written in docker-compose:
$ docker-compose build
To up the containers with the detached mode:
$ docker-compose up -d
To build and up at the same time (this might not work if this is the first time you up the containers):
$ docker-compose up -d --build
To build without using cached data:
$ docker-compose build --no-cach
To stop the project:
$ sudo docker stop $(sudo docker ps -aq)
To delete docker objects:
$ docker system prune --volumes -f
To check containers' status:
$ docker ps -a
To access running container and use bash inside (please note that "webapp" is the target container name):
$ docker exec -it webapp /bin/bash
To Delete all info:
docker-compose down -v --rmi all --remove-orphans
docker rm $(docker ps -a -q)
docker rmi $(docker images -q)
docker volume rm $(docker volume ls -q)
To check last 50 (error) messages of a container (please note that "webapp" is the target container name):
$ docker logs --tail 50 --follow --timestamps webapp

Tuesday, January 15, 2019

Vue.js How to use v-for

The Result

  • The message is {{ item.message }} and the name is {{ item.name }} (age {{ item.age }}).

The code

<ul id="example-1">
   <li v-for="item in items">The message is {{ item.message }}, and the name is {{ item.name }} (age {{ item.age }}).</li>
</ul>

<script src="https://cdn.jsdelivr.net/npm/vue@2.5.21/dist/vue.js"></script>
<script type="application/javascript">
var example1 = new Vue({
  el: '#example-1',
  data: {
    items: [
      { message: 'Foo', name: 'John', age: '25' },
      { message: 'Bar', name: 'Mike', age: '30' },
      { message: 'FooBar', name: 'Jack', age: '18' }
    ]
  }
})
</script>

The official document


Thursday, January 3, 2019

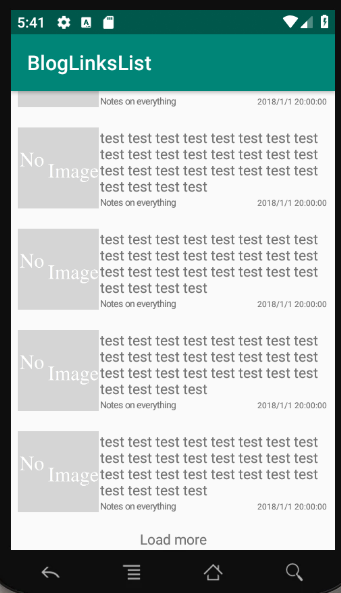
[Android app] Blog links list Sample

[Android app] Blog links list Sample on git hub
Written by Kotlin.


Django setup memo for development

What is Django and why Django?

Django is a web framework of Python. Also I think Django is the most popular Python's framework.

Install dependencies

If you have followed my other posts, you should have python3.6 in your virtual CentOS7 machine:
$ python3.6 --version

Python 3.6.5
Install git:
$ sudo yum install -y git
We will use pyenv which is a virtual environment for Python (but not like virtual machines. See this stackoverflow for detail: Is pyenv or virtualenv essential for Django?
$ cd /vagrant
$ python3.6 -m venv djangoapp
$ ls

djangoapp  index.py  Vagrantfile
Start the virtual environment:
$ source ./djangoapp/bin/activate
Inside the virtual environment, you can use different version of python from the python installed in CentOS system (if needed). We will use simply Python3.6 installed in CentOS though.
(djangoapp) [vagrant@localhost vagrant]$ python --version
Python 3.6.5
(djangoapp) [vagrant@localhost vagrant]$ which python
/vagrant/djangoapp/bin/python
(djangoapp) [vagrant@localhost vagrant]$ pip --version
pip 10.0.1 from /vagrant/djangoapp/lib64/python3.6/site-packages/pip (python 3.6)
If you want to stop the virtual environment (But you don't need to stop it yet):
$ deactivate
We will create a database in mysql for Django.
$ mysql -u root -proot
mysql> CREATE DATABASE testdb CHARACTER SET utf8;
mysql> exit

Install Django

We will install Django from pip:
$ python3.6 -m pip install django
Check if Django was installed successfully:
$ python3.6 -m django --version

Configuration of Django

Create your first Django project
$ cd /vagrant/djangoapp
$ django-admin startproject mypj
$ ls

bin  include  lib  lib64  mypj(<--Your project)  pip-selfcheck.json  pyvenv.cfg
Open the file "setting.py" as follows. And change the Allowed hosts values.
$ sudo vi ./mypj/mypj/settings.py
Allowed hosts (Assuming that your virtual server's IP address is "192.168.33.10"):
ALLOWED_HOSTS = ['localhost','192.168.33.10']
Save and close it by :wq.
Run this command and start the built-in server of Django:
$ cd /vagrant/djangoapp
$ python3.6 mypj/manage.py runserver 0.0.0:8000
Ctrl + c to stop the built-in server. Your Django is working here: http://192.168.33.10:8000/

If this is displayed, you successfully installed Django. Stop the built-in server by Ctrl + c after confirming this.

Hello World

Run the following commands to add "mywebsite":
$ cd /vagrant/djangoapp/mypj
$ python3.6 manage.py startapp mywebsite
$ ls
db.sqlite3  manage.py  mypj  mywebsite
$ ls ./mywebsite
admin.py  apps.py  __init__.py  migrations  models.py  tests.py  views.py
mywebsite was added in the directory of mypj.
Run the following commands to add a new page.
$ cd /vagrant/djangoapp/mypj/mywebsite
$ sudo vi views.py
Then add this inside:
def index(request):
    return HttpResponse("Hello, world Django!!!!")


Now create a file named "urls.py":
$ sudo vi urls.py
And write as follows inside:
from django.urls import path
from . import views

urlpatterns = [
    path('', views.index, name='index'),
]
We will add the path in the mypj:
$ cd /vagrant/djangoapp/mypj/mypj
$ ls
Open urls.py and add the path:
$ sudo vi urls.py
Write as follows:
from django.contrib import admin
from django.urls import include, path

urlpatterns = [
    path('mywebsite/', include('mywebsite.urls')),
    path('admin/', admin.site.urls),
]

Now run the server:
$ cd /vagrant/djangoapp/mypj
$ python3.6 manage.py runserver 0.0.0:8000
Go to: http://192.168.33.10:8000/mywebsite/ You will see Hello World: 

Django production deployment

Don't use the built-in server for production deloyment. See the official website of Django for the deployment.