At first, install "git" like this:
$ sudo yum install -y git
Check if pip of python3 is installed:
$ python3.6 -m pip --version

If pip of python3 is installed, this will be displayed.
Some other tutorial might say we need "virtualenv" but we don't install it because python3 has "pyenv" and we can use this instead of virtualenv. But if you want to use Django with python2, installing virtualenv is essential.
Create a folder of pyenv with python3.6 like this:
$ cd /vagrant
$ python3.6 -m venv djangoapp
Why do we need pyenv/virtualenv?$ python3.6 -m venv djangoapp
If this doesn't work and can't create the folder, stop virtual machine (vagrant halt) and run CMD and Teraterm as an administrator. Then try these commands again.
Start the virtual environment of pyenv:
$ source ./djangoapp/bin/activate
If you want to stop the virtual environment:
$ deactivateBut you don't need to stop it yet.
Update pip of the virtual environment if necessary:
Because we are in the virtual environment, the python and pip of virtual environement will be used:

Sign in to mysql and create a table:
Then install nginx (web server software) and remove Apache (also web server software):
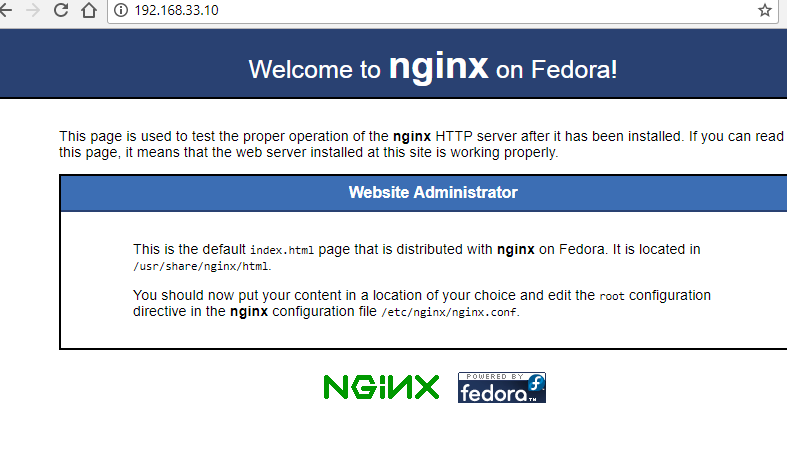
Go to "http://192.168.33.10/" and check if nginx is working correctly.

The configuration file of nginx is here: /etc/nginx/nginx.conf
Install the Django framework:
The files to serve of nginx are here: /usr/share/nginx/html
You can see the configuration in nginx.conf:

And Install uwsgi (WSGI: Web Server Gateway Interface):
Create a project of Django:
After doing these commands, you will get a project folder of Django in this directory: /vagrant/djangoapp. The name of the project folder is "mypj". And in the mypj folder, you will find that there is another mypj folder there.


Open the file "setting.py" that is in the folder "mypj".

Add "localhost" and "192.168.33.10" to "Allowed_Hosts" like this:

Run this command and start the built-in server of Django:
Go to the URL: http://192.168.33.10:8000/

If this is displayed, it means you successfully installed Django :)
Now we stop the built-in server with ctrl+c.

Go to the mypj directory on the console.

We will create a top-level module in this directory.

In the mywebsite directory, you can see that these files are there:

Open the view.py and write as follows:
Create a file called "urls.py".

Write as follows in urls.py:
Now go back to djangoapp/mypj/mypj (the submodule of mypj) and open urls.py.
 Import "include" and add this path.
Run the server.
Go to http://192.168.33.10:8000/mywebsite/ and you will see the message you defined in index function.

Check if uWSGI can connect to Django by the following command:
$ python3.6 -m pip install --upgrade pip
Because we are in the virtual environment, the python and pip of virtual environement will be used:
$ python --version
Python 3.6.7
$ which python
/vagrant/djangoapp/bin/python
$ pip --version
pip 9.0.1 from /vagrant/djangoapp/lib64/python3.6/site-packages (python 3.6)
Python 3.6.7
$ which python
/vagrant/djangoapp/bin/python
$ pip --version
pip 9.0.1 from /vagrant/djangoapp/lib64/python3.6/site-packages (python 3.6)
$ mysql -u root -proot
mysql> CREATE DATABASE testdb CHARACTER SET utf8;
mysql> exit
mysql> CREATE DATABASE testdb CHARACTER SET utf8;
mysql> exit
Then install nginx (web server software) and remove Apache (also web server software):
$ sudo yum remove -y httpd
$ sudo yum autoremove
$ sudo rpm -Uvh https://dl.fedoraproject.org/pub/epel/epel-release-latest-7.noarch.rpm
$ sudo yum install -y nginx
$ sudo systemctl start nginx
$ sudo yum autoremove
$ sudo rpm -Uvh https://dl.fedoraproject.org/pub/epel/epel-release-latest-7.noarch.rpm
$ sudo yum install -y nginx
$ sudo systemctl start nginx
$ sudo systemctl enable nginx
Go to "http://192.168.33.10/" and check if nginx is working correctly.
The configuration file of nginx is here: /etc/nginx/nginx.conf
$ less /etc/nginx/nginx.conf
Install the Django framework:
$ python3.6 -m pip install django
The files to serve of nginx are here: /usr/share/nginx/html
$ ls /usr/share/nginx/html
You can see the configuration in nginx.conf:
$ vi /etc/nginx/nginx.conf

here
And Install uwsgi (WSGI: Web Server Gateway Interface):
$ python3.6 -m pip install uwsgi
Django framework
Create a project of Django:
$ cd /vagrant/djangoapp
$ django-admin startproject mypj
$ django-admin startproject mypj
After doing these commands, you will get a project folder of Django in this directory: /vagrant/djangoapp. The name of the project folder is "mypj". And in the mypj folder, you will find that there is another mypj folder there.
In the folder....

Open the file "setting.py" that is in the folder "mypj".

Add "localhost" and "192.168.33.10" to "Allowed_Hosts" like this:
ALLOWED_HOSTS = ['localhost','192.168.33.10']
(Assuming that your virtual server's IP address is "192.168.33.10")Run this command and start the built-in server of Django:
$ python mypj/manage.py runserver 0.0.0:8000
Go to the URL: http://192.168.33.10:8000/

If this is displayed, it means you successfully installed Django :)
Hello World
Now we stop the built-in server with ctrl+c.
Go to the mypj directory on the console.
$ cd ./mypj
There is manage,py at this directory of django
We will create a top-level module in this directory.
$ python3.6 manage.py startapp mywebsite
mywebsite directory is created
In the mywebsite directory, you can see that these files are there:
Open the view.py and write as follows:
from django.shortcuts import render
# Create your views here.
from django.http import HttpResponse
def index(request):
return HttpResponse("Hello, world Django!!!!")
# Create your views here.
from django.http import HttpResponse
def index(request):
return HttpResponse("Hello, world Django!!!!")
Create a file called "urls.py".
Write as follows in urls.py:
from django.urls import path
from . import views
urlpatterns = [
path('', views.index, name='index'),
]
from . import views
urlpatterns = [
path('', views.index, name='index'),
]
Now go back to djangoapp/mypj/mypj (the submodule of mypj) and open urls.py.
from django.contrib import admin
from django.urls import include, path
urlpatterns = [
path('mywebsite/', include('mywebsite.urls')),
path('admin/', admin.site.urls),
from django.urls import include, path
urlpatterns = [
path('mywebsite/', include('mywebsite.urls')),
path('admin/', admin.site.urls),
]
Run the server.
$ cd /vagrant/djangoapp/mypj
$ python3.6 manage.py runserver 0.0.0:8000
$ python3.6 manage.py runserver 0.0.0:8000
Go to http://192.168.33.10:8000/mywebsite/ and you will see the message you defined in index function.
Check if uWSGI can connect to Django
Check if uWSGI can connect to Django by the following command:
$ cd /vagrant/djangoapp/mypj
$ uwsgi --http :8000 --module mypj.wsgi
$ uwsgi --http :8000 --module mypj.wsgi
Go to http://192.168.33.10:8000/mywebsite/ and see if your Hello Django message properly.
After checking if it works, ctrl + c to stop uwsgi.
